Using Azure kubernetes managed service in private cloud topology
Azure kubernetes managed service
Kubernetes is the most common open source orchestrator for containerized application, it was developed by Google.
Azure provides the ability to provision fully managed Kubernetes cluster using AKS service , by default AKS exposes Kubernetes API through public IP.
But it’s also possible to protect your cluster and allow access only through private network using clould hybrid architecture and private endpoint feature.
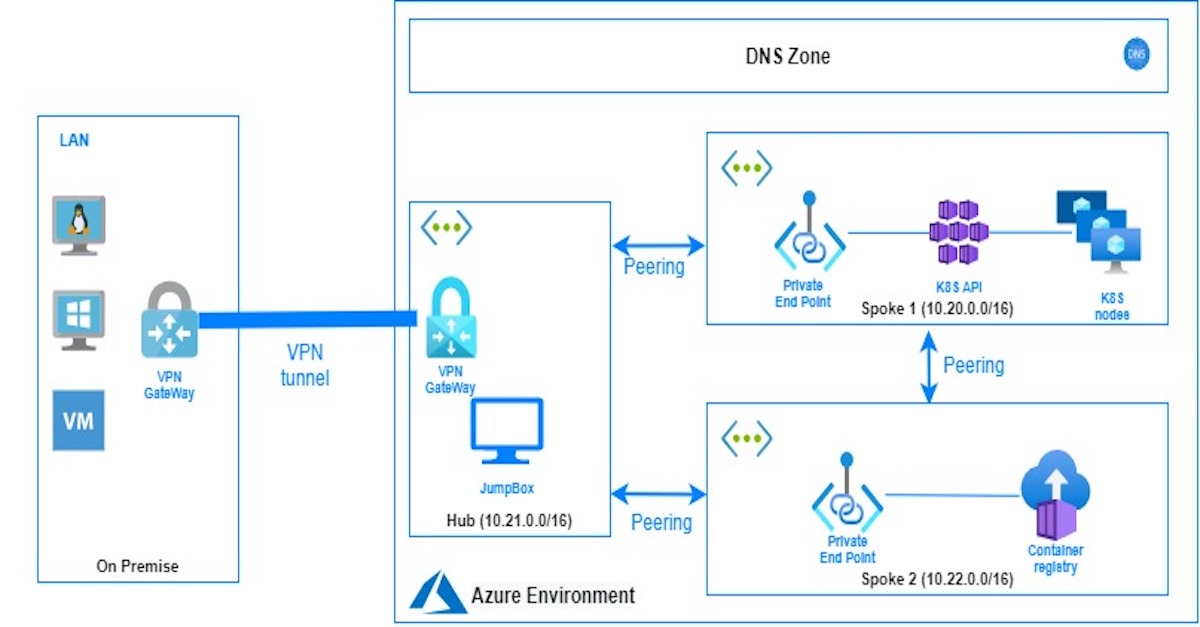
In this tutorial we are going to create fully managed private Kubernetes environment, by implementing Hob-spoke network topology in azure.
We are going to define two spoke virtual networks:
- Spoke 1 : this virtual network will contain Kubernetes cluster and all the components related to the creation of K8S cluster.
- Spoke 2 : this virtual network will contain Azure container registry , to store and pull docker images.
In the Hub virtual network, we are going to provision the Jumpbox and Virtual network gateway to connect the cloud environment to the on-premises network using a secure VPN tunnel.
Parameters initialization
First, we are going to start by initializing all parameters that we need for this tutorial.
##Variables declaration
##Spoke 1 : AKS Zone
location="eastus"
aks_resource_group_name="spoke1-aks-zone"
cluster_name="rakata-aks"
cluster_node_size="Standard_B2s"
cluster_node_count="1"
node_disk_size="30"
aks_vnet_zone_name="AKS-vnet"
aks_vnet_zone_prefix="10.20.0.0/16"
aks_subnet_zone_name="AKS-subnet"
aks_subnet_zone_prefix="10.20.1.0/24"
## Spoke 2: ACR Zone
acr_resource_group_name="spoke2-acr-zone"
acr_name="rakataregistry"
acr_vnet_zone_name="acr-vnet"
acr_vnet_zone_prefix="10.22.0.0/16"
acr_subnet_zone_name="acr-subnet"
acr_subnet_zone_prefix="10.22.1.0/24"
acr_private_link="privatelink.azurecr.io"
acr_private_aks_role_reader="acr_private_aks_role_reader"
##HUB : Jump Zone
hub_resource_group_name="cloud-hub-zone"
hub_vnet_zone_name="hub-vnet"
hub_vnet_zone_prefix="10.21.0.0/16"
hub_subnet_zone_name="hub-subnet"
hub_subnet_zone_prefix="10.21.1.0/24"
hub_jumpbox_public_ip_address="jumpboxIP"
hub_jumpbox_name="JumpBox"
hub_gateway_subnet_prefix="10.21.255.0/27"
hub_gateway_subnet_name="GatewaySubnet"
hub_gateway_public_ip="VNet1GWIP"
hub_gateway_name="hub_vpn_gateway"
Azure vnets Creation and peering
In the next step we create a resource group and virtual network vnet for each zone ( Spoke 1, Spocke 2 and Hub).
## Create resources groups

az group create --name $aks_resource_group_name --location $location
az group create --name $acr_resource_group_name --location $location
az group create --name $hub_resource_group_name --location $location

## Create spoke 1 AKS VNet and SubNet
az network vnet create \
    --resource-group $aks_resource_group_name \
    --name $aks_vnet_zone_name \
    --address-prefix $aks_vnet_zone_prefix \
    --subnet-name $aks_subnet_zone_name \
    --subnet-prefix $aks_subnet_zone_prefix

## Create spoke 2 ACR VNet and SubNet
az network vnet create \
    --resource-group $acr_resource_group_name \
    --name $acr_vnet_zone_name \
    --address-prefix $acr_vnet_zone_prefix \
    --subnet-name $acr_subnet_zone_name \
    --subnet-prefix $acr_subnet_zone_prefix

## Create hub VNet and SubNet
az network vnet create \
    --resource-group $hub_resource_group_name \
    --name $hub_vnet_zone_name \
    --address-prefix $hub_vnet_zone_prefix \
    --subnet-name $hub_subnet_zone_name \
    --subnet-prefix $hub_subnet_zone_prefix
Now we need to enable the communication between the three vnets :
- Hub needs to connect to spoke 1 to mange kubernetes cluster using Kubectl command
- Hub needs to connect to spoke 2 to push images from the Jumbox to ACR
- Spoke1 needs to connect to Spoke2 to enable AKS to pull images from the ACR during the deployment.
The script below enables the peering between the vnets
### Peering AKS Zone with hub zone
az network vnet peering create \
    --resource-group $aks_resource_group_name \
    --name "${aks_vnet_zone_name}-to-${hub_vnet_zone_name}" \
    --vnet-name $aks_vnet_zone_name \
    --remote-vnet $vnet_hub_id \
    --allow-vnet-access \
    --allow-forwarded-traffic

az network vnet peering create \
    --resource-group $hub_resource_group_name \
    -name "${hub_vnet_zone_name}-to-${aks_vnet_zone_name}" \
    --vnet-name $hub_vnet_zone_name \
    --remote-vnet $vnet_aks_id \
    --allow-vnet-access \
    --allow-forwarded-traffic

### Peering ACR Zone with hub zone
az network vnet peering create \
    --resource-group $acr_resource_group_name \
    --name "${acs_vnet_zone_name}-to-${hub_vnet_zone_name}" \
    --vnet-name $acs_vnet_zone_name \
    --remote-vnet $vnet_hub_id \
    --allow-vnet-access \
    --allow-forwarded-traffic

az network vnet peering create \
    --resource-group $hub_resource_group_name \
    --name "${hub_vnet_zone_name}-to-${acs_vnet_zone_name}" \
    --vnet-name $hub_vnet_zone_name \
    --remote-vnet $vnet_acr_id \
    --allow-vnet-access \
    --allow-forwarded-traffic

### Peering AKS Zone with ACR Zone
az network vnet peering create \
    --resource-group $aks_resource_group_name \
    --name "${aks_vnet_zone_name}-to-${acr_vnet_zone_name}" \
    --vnet-name $aks_vnet_zone_name \
    --remote-vnet $vnet_acr_id \
    --allow-vnet-access \
    --allow-forwarded-traffic

az network vnet peering create \
    --resource-group $acr_resource_group_name \
    --name "${acr_vnet_zone_name}-to-${aks_vnet_zone_name}" \
    --vnet-name $acr_vnet_zone_name \
    --remote-vnet $vnet_aks_id \
    --allow-vnet-access \
    --allow-forwarded-traffic
Private AKS Creation
Now we are going to create AKS , –enable-private-cluster parameter enables private link for K8S API Server. before creating AKS , we get the last available stable version of Kubernetes for the current location
## Create AKS Private cluster
aks_subnet_zone_id=$(az network vnet subnet show --name $aks_subnet_zone_name \
                            --vnet-name $aks_vnet_zone_name \
                            --resource-group $aks_resource_group_name \
                            --query id --output tsv)

## Get the latest AKS version available in the curent location
AKS_VERSION=$(az aks get-versions --location $location \
            --query "orchestrators[?to_string(isPreview)=='null'] | [-1].orchestratorVersion" \
            --output tsv)
echo $AKS_VERSION

az aks create --resource-group $aks_resource_group_name \
              --name $cluster_name \
              --kubernetes-version $AKS_VERSION \
              --location $location \
              --enable-private-cluster \
              --node-vm-size $cluster_node_size \
              --load-balancer-sku standard \
              --node-count $cluster_node_count \
              --node-osdisk-size $node_disk_size \
              --network-plugin kubenet \
              --vnet-subnet-id $aks_subnet_zone_id \
              --docker-bridge-address 172.17.0.1/16 \
              --dns-service-ip 10.30.0.10 \
              --service-cidr 10.30.0.0/16
Now we created private AKS cluster , the API server can only be reachable from the AKS vnet or peered vnets.
Creation of the jumpbox in hub vnet
In this step we create the jumpbox in hub vnet.
az network public-ip create \
    --resource-group $hub_resource_group_name \
    --name $hub_jumpbox_public_ip_address \
    --allocation-method dynamic \
    --sku basic

az vm create --name $hub_jumpbox_name  \
             --resource-group $hub_resource_group_name \
             --image UbuntuLTS \
             --location $location \
             --size Standard_A1_v2 \
             --authentication-type ssh \
             --ssh-key-values ~/.ssh/id_rsa.pub \
             --admin-username jumboxadmin  \
             --vnet-name $hub_vnet_zone_name \
             --subnet $hub_subnet_zone_name \
             --public-ip-address $hub_jumpbox_public_ip_address

jumpbox_vm_public_ip=$(az vm  show -d --name $hub_jumpbox_name \
             --resource-group $hub_resource_group_name \
             --query publicIps -o tsv)
After that we need to link the hub vnet to the private dns Zone created during the creation of the AKS cluster.
node_resource_group=$(az aks show --name $cluster_name \
    --resource-group $aks_resource_group_name \
    --query 'nodeResourceGroup' -o tsv)

echo $node_resource_group

dnszone=$(az network private-dns zone list \
    --resource-group $node_resource_group \
    --query [0].name -o tsv)

az network private-dns link vnet create \
    --name "${hub_vnet_zone_name}-${hub_resource_group_name}" \
    --resource-group $node_resource_group \
    --virtual-network $vnet_hub_id \
    --zone-name $dnszone \
    --registration-enabled false
Creation of the ACR in spoke 2 vnet
Now we need to create a private Azure Container registry , first we create ACR , then we need to disable the private end point policy from the subnet, after that we create the private end point , we need also to create private dns zone with the name as privatelink.azurecr.io and add A records with private ip addresses of the registry and the data acr endpoints.
Finally we are going to disable the public access to the ACR
az acr create \
  --name $acr_name \
  --resource-group $acr_resource_group_name \
  --sku Premium

REGISTRY_ID=$(az acr show --name $acr_name \
  --query 'id' --output tsv)

REGISTRY_LOGIN_SERVER=$(az acr show --name $acr_name \
  --query 'loginServer' --output tsv)

echo $REGISTRY_ID
echo $REGISTRY_LOGIN_SERVER
##disable subunet private endpoit policies
az network vnet subnet update \
 --name  $acr_subnet_zone_name \
 --vnet-name $acr_vnet_zone_name \
 --resource-group $acr_resource_group_name \
 --disable-private-endpoint-network-policies

##Create acr private endpoint
az network private-endpoint create \
    --name "${acr_name}-${acr_resource_group_name}" \
    --resource-group $acr_resource_group_name \
    --vnet-name $acr_vnet_zone_name \
    --subnet $acr_subnet_zone_name \
    --private-connection-resource-id $REGISTRY_ID \
    --group-ids registry \
    --connection-name "${acr_name}-${acr_resource_group_name}-cnx"

##create private dns zone with the same name as acr registry
 az network private-dns zone create \
  --resource-group $acr_resource_group_name \
  --name $acr_private_link

##Get acr endpoint and data acr endpoint ip private addresses
acr_private_network_id=$(az network private-endpoint show \
  --name "${acr_name}-${acr_resource_group_name}" \
  --resource-group $acr_resource_group_name \
  --query 'networkInterfaces[0].id' \
  --output tsv)

acr_private_ip=$(az resource show \
  --ids $acr_private_network_id \
  --query 'properties.ipConfigurations[1].properties.privateIPAddress' \
  --output tsv)

data_acr_private_ip=$(az resource show \
  --ids $acr_private_network_id \
  --query 'properties.ipConfigurations[0].properties.privateIPAddress' \
  --output tsv)

echo $acr_private_ip
echo $data_acr_private_ip

##create A records in the private dns zone
az network private-dns record-set a create \
  --name $acr_name \
  --zone-name $acr_private_link \
  --resource-group $acr_resource_group_name

az network private-dns record-set a create \
  --name ${acr_name}.${location}.data \
  --zone-name $acr_private_link \
  --resource-group $acr_resource_group_name

az network private-dns record-set a add-record \
  --record-set-name $acr_name \
  --zone-name $acr_private_link \
  --resource-group $acr_resource_group_name \
  --ipv4-address $acr_private_ip

az network private-dns record-set a add-record \
  --record-set-name ${acr_name}.${location}.data \
  --zone-name $acr_private_link \
  --resource-group $acr_resource_group_name \
  --ipv4-address $data_acr_private_ip

##Disable public access
echo $acr_name
az acr update --name $acr_name --default-action Deny
To have the ability to reach the acr from the Hub zone and the aks zone using the private domain name , we need to link the two vnets to ACR private dns zone.
az network private-dns link vnet create \
    --name "${hub_vnet_zone_name}-${hub_resource_group_name}" \
    --resource-group $acr_resource_group_name \
    --virtual-network $vnet_hub_id \
    --zone-name $acr_private_link \
    --registration-enabled false

## Link AKS private network to acr private dns zone
az network private-dns link vnet create \
    --name "${aks_vnet_zone_name}-${aks_resource_group_name}" \
    --resource-group $acr_resource_group_name \
    --virtual-network $vnet_aks_id \
    --zone-name $acr_private_link \
    --registration-enabled false
As you know AKS needs to be authenticated to pull images from the ACR , there are many ways to ensure that , for this tutorial we are going to use Azure service principal and RBAC. we create a service principal, and assign to it the read role from the ACR scope, then we need to update the AKS credential with the created service principal.
acr_aks_role_password=$(az ad sp create-for-rbac \
             --name $acr_private_aks_role_reader  --query password -o tsv )
acr_aks_role_id=$(az ad sp list --show-mine \
            --query "[?displayName=='${acr_private_aks_role_reader}'].appId | [0]" \
            --output tsv)

az role assignment create --assignee  $acr_aks_role_id --scope $REGISTRY_ID --role Reader

az aks update-credentials --resource-group $aks_resource_group_name \
                          --name $cluster_name \
                          --reset-service-principal \
                          --service-principal $acr_aks_role_id \
                          --client-secret $acr_aks_role_password
Prepare the JumpBox and deploy the first service
From the JumBox we need to install those prerequisites to manage our cluster
- Azure_cli tools
- Kubectl command
- Configuration file to access to AKS cluster
- Docker.io
- HELM ( K8S package manager)
Execute the script jumbox-install.sh to install all these prerequisite
Now from the jumbox we are going to pull a public docker image , tag it with the name of our ACR then push it to the private registry
sudo docker pull neilpeterson/aks-helloworld:v1
sudo docker tag neilpeterson/aks-helloworld:v1 rakataregistry.azurecr.io/aks-helloworld:v1
sudo docker push rakataregistry.azurecr.io/aks-helloworld
To deploy the helloworld service from the private ACR we have to execute the command below from the jumbpx ,please note that you need to download aks-helloworld-one.yaml into the jumpbox.
kubectl apply -f aks-helloworld-one.yaml
To check if everything is working as expected, you can check the status of deployment by executing the command below
kubectl get all
Local network facing ingress
To access to the service from outside of the cluster, we need to install ingress gateway controller.
Using helm we install ngnix-ingress and enable a private load balancer.
# Create a namespace for your ingress resources
kubectl create namespace ingress-basic

# Add the official stable repository
helm repo add stable https://kubernetes-charts.storage.googleapis.com/

# Use Helm to deploy an NGINX ingress controller
helm install nginx-ingress stable/nginx-ingress \
    --namespace ingress-basic \
    -f internal-ingress.yaml \
    --set controller.replicaCount=2 \
    --set controller.nodeSelector."beta\.kubernetes\.io/os"=linux \
    --set defaultBackend.nodeSelector."beta\.kubernetes\.io/os"=linux
The internal-ingress.yaml contains the configuration required to enable the private load balancer
controller:
  service:
    loadBalancerIP: 10.20.1.240
    annotations:
      service.beta.kubernetes.io/azure-load-balancer-internal: "true"
The last step is to create ingress configuration to expose hello-word service to the private network.
kubectl apply -f hello-world-ingress.yaml
Now you can access to hello-word services from the jumbox using the URI below
curl http://10.20.1.240/hello-world-one
Create the VPN tunnel
Every thing is working fine from the jumbox ,we need to connect the hub private vnet to the on-premise vnet, we are going to create VPN gateway in the hub vnet.
Azure network gateway requires /27 subnet and dynamic IP address, the creation of the Vnet gateway will take more than 20 minutes
az network vnet subnet create --name $hub_gateway_subnet_name \
            --resource-group $hub_resource_group_name \
            --vnet-name $hub_vnet_zone_name  \
            --address-prefixes $hub_gateway_subnet_prefix

az network public-ip create --name $hub_gateway_public_ip \
                            --resource-group $hub_resource_group_name \
                            --allocation-method Dynamic

az network vnet-gateway create \
            --name $hub_gateway_name \
            --location $location \
            --resource-group $hub_resource_group_name \
            --public-ip-address $hub_gateway_public_ip \
            --vnet $hub_vnet_zone_name \
            --gateway-type Vpn \
            --sku  VpnGw1 \
            --vpn-type RouteBased \
            --no-wait

az network vnet-gateway show \
            --name $hub_gateway_name \
            --resource-group $hub_resource_group_name \
            --query provisioningState \
            --output tsv
After the creation of the VPN gateway you need to configure a Site2Site connection with your on-premises VPN gateway, the configuration depends on the software used in on-premise environment.
In the this demo , we are going to configure Point to Site connection, that allows you to install client VPN in your desktop and connect to Azure private environment.
The configuration of the certificates and the private key are explained in generate-certificate.sh.
Now that you have your certificate and private key, you can configure your P2S and download the client VPN software.
az network vnet-gateway update \
                --name $hub_gateway_name \
                --resource-group $hub_resource_group_name \
                --client-protocol SSTP \
                --address-prefixes 172.16.1.0/24

az network vnet-gateway root-cert create \
                --resource-group $hub_resource_group_name \
                --name P2SRootCert \
                --gateway-name $hub_gateway_name \
                --public-cert-data caCert.cer

az network vnet-gateway vpn-client generate \
            --name $hub_gateway_name \
            --resource-group $hub_resource_group_name \
            --processor-architecture Amd64
Let’s have and use your AKS private cluster !!